Showing posts with label I guess this is a tutorial. Show all posts

Friday, May 1, 2015

Filming (Notes from “How to Shoot Video that Doesn’t Suck”)


In history our third-quarter project gave us absolute freedom to do whatever we wanted. My friends and I (who have already made a movie together) decided to pull together and create a second masterpiece. In preparation, I skimmed the book  How to Shoot Video that Doesn't Suck and made notes for myself and our other camera lady. 
__________

When the camera is placed in your hands, you are now the filmographer and the director. It is up to you to make sure that the scene you film is as good as it can possibly be. Here are some tips from my film book:

Think in shots
  • Is what you’re filming interesting? How can you make the scene more interesting?
  • What is the point of focus?
  • How can you convey the emotion/dynamic/action/plot of the shot better?

Avoid super long panoramic views
  • Mostly because we want to keep this video under 10 minutes (though it may have to be longer simply because we need to have 10 hours each, and since some of y’all aren’t writing/editing)
  • One or two might be nice to set a scene or whatever, and it wouldn’t kill us to film them, but a 10 second view of the landscape isn’t that interesting.

Keep shots under 10 seconds
  • unless it’s ABSOLUTELY NECESSARY, do not shoot the same shot for more than 10/15 seconds.
  • It becomes boring and the action of the scene is broken. I know that for us most of our shots will probably be a little long (that’s ok) but we don’t want to slow it down.

Close ups & zooming
  • Don’t stand 5 feet away from the person and then zoom in with the screen.
    • it makes the footage more unstable
    • it makes the footage loose quality
    • neither of those will get us an A
  • If we are doing a close face shot, actually stand close enough to make the shot without zooming. It may be a little uncomfortable and awkward, but we don't want to zoom too much. If we really need to, I can zoom later in editing.

Keep the light behind you
  • Unless we have a reason to have the light behind the character, it’s usually best to keep everything in the shot well-lit

Turn off ALL digital effects
  • Unless it’s something we can only do on the phone, then please let Amanda deal with it after in the editing process. It makes life simpler.

Stand still while filming

Remember the intent of the scene
  • Is the character happy/sad/angry/at war/waiting for news of the war/listening to the radio... the actor needs to do their part to convey the scene, it’s the filmers part to make sure that nothings lost between face and film
  • Know the story and the scene, it will make this part much easier

Plan a shot list
  • We’ll plan a few specific shots in the writing meeting, but the rest of the shots will be decided on-site.
  • So basically make sure you know what you’re filming

Make the star look great
  • If they obviously have no clue what is going on, stop the video, stop them, and save us a the embarrassment of turning in a bad movie
  • Make sure they actually look good. Sometimes cameras picu up weird lighting or whatever,  so make sure they’re not too washed out/shadowed.


COMMIT YOURSELF TO A STANDARD OF EXCELLENCE

Thursday, March 26, 2015

Shaak Ti Cosplay: Planning

Hey everyone! Sorry for dropping off the face of the earth like that... I know I had scheduled posts, but it's still not the same xD I have a million posts to check out now that i'm actually on blogger again haha

Ok, so obviously I'm a huge Star Wars fan, and I'm going to CVII Anaheim this April!! I am so, so excited, because the Lakehousers have a big dinner planned and there's a whole bunch of awesome things to do and I finally get to meet/see my friends and it's going to be AMAZING!!

Of course I'm doing a costume- one that I've been planning on making since I first ventured into cosplay- Shaak Ti! Yep! Finally doing it! 

My main reference is the TCW version (right), but I'm also taking inspiration from the film version. It's a little difficult when a character has two different versions that are so similar! I personally like the colors of the TCW version better- it gives a little more variety. Also, the Lekku have more defined markings towards the top, and I like that better. 

Another reason why I'm doing the TCW version is because I have the character sheet. It's nice to have an official reference, and it makes design sooo much easier! I'm doing some details different because either it will be easier, or just to add personal flair, but for the most part it will look pretty similar.

Another thing about this costume: I'm only making about 4 parts of it (not including body paint)
-Lekku + headdress
-Belt
-Sash Thing
-Jedi Robe (possibly)

If I have time I'll make arm guards and ditch the robe idea, because it can get really hot with all that body paint on xD

Material List:
Sash
-1/3 x 1 yard of tan vynal
-ruler and pencil
-crimson, yellow ochre, and burnt sienna acrlyc paint
-Scissors and an Exacto Knife

Belt
-Silver or Gold buckle 
-Brown or Black belt (I may make this out of vinyl)
-Belt Pouches/lightsaber area (I may make these out of vinyl, too)

Dress (skirt/top)
-Reddish-brown floor length skirt
-Brown or black scoop-neck shirt

Lekku
I'll possibly be making this out of carving foam, but I'm not entirely sure yet. 

Accessories
-Arm Guards? 
-Headdress
       -wire, dragon's breath opal, assorted beads, silver-painted craft foam
-Brown leggings and Boots
-lightsaber  (I might make this and just do the hilt_
-Jedi Cloak + Gold tri


I'll update this list with links to anything I buy, but here it is! The start of my Shaak Ti costume!!


Friday, June 13, 2014

Con Notes: Cosplay by Strawberry Censor

So, first installment of my convention notes from the past school year! I went to 4 conventions (Anime iCon, Dickens Fair, a local con, and Kraken Con), and have notes from three of them. Yep! So to start off, here are my notes from Strawberry Censor's cosplay panel at iCon! (the main topic was makeup). I'm going to write my side notes in italics. 


  • Always wear makeup, regardless of your gender or your character's. Why? Well...
    • Pictures- it is easy to look washed out or for blemishes to show 
    • Character accuracy- even if your character doesn't wear makeup, using a bit can make you look more like that character
      • like if you have a round face, you can shade your face to make it look more square or whatever you need for said character.
    • most characters (especially in anime) have flawless skin
  • Makeup Basics
    • Keep your face clean. This is not only helpful in cosplay, but in day to day life, as well ;)
    • Moisturize! 
    • Use primer [I have actually never done this and don't feel the need to. I honestly think it's a waste of time/money]
    • Contouring/ highlighting your face can give a better illusion of the character your trying to cosplay (especially if they have a different face shape than you)
      • Just don't over-do it. Too much can look caked on and "fake"
      • this is also very useful for crossplaying. You can easily make yourself look more masculine/feminine with the right shading
    • Where to get makeup?
      • Sephora
      • Urban Decay (they have a 120 color eyeshadow set that is great for cosplay)
      • Really there is no need for brand name makeup, local drugstore makeup works just fine!
  • Face
    • Lots of concealer can cover up droopy eyes
      • an inverted triangle of concealer helps hide dark circles
      • Potatoes or cold spoons help get rid of puffey eyes. Just stick the spoons in the freezer overnight, and hold them over your eyes in the morning
    • Simulate puffy eyes by using lots of eyeliner and then smearing it a little
    • Use a spray to seal makeup
    • Use liquid latex for scales
    • Doing a zombie? Use diluted jello mix, let it dry, and then make it crack.
  • Eyes
    • Highlight your eyes
      • It draws focus to your eyes, and helps to avoid making them look strange in photos
      • you can use makeup to narrow/widen your eyes, which is especially helpful with anime characters.
    • Eyelashes
      • thin lashes look more natural
      • larger eyes means you can wear more lashes
      • they can either make your eyes pop or make them look more narrow
      • it is more comfortable to put false lashes a little higher up than you're actual lashes
      • as i am typing this i wonder "why do we call them lashes? it makes no sense..."
    • Using Contacts
      • Great not only for changing your eye color, but can also make your eyes look bigger
        • You can order prescription contacts from some companies
        • Get a prescription if you are getting contacts. Most problems that you hear of from color contacts don't come from the contacts themselves, but because they don't fit right.
        • Effects contacts can add a lot to a costume (such as white mesh or full color, whatever fits your character) but they can be hard to see out of, and uncomfortable to wear for long periods of time
  • Lips
    • To create the "perfect cupid's bow", here is a good tutorial
    • To make lips look thinner
      • use concealer to make your lips relatively invisible
      • color darker in the center, in order to draw attention to the colored part, not the concealed area
    • To make lips look fuller
      • line lips just on the outside of your lip line
      • highlight on upper lip (especially cupids bow)
      So here I combined both- used concealer over my whole lip, and then used liner around part of my lip to create the "porcelain doll" look
  • Other
    • Guy Makeup
      • Thicken your eyebrows. I personally use an eyeliner pencil a shade darker than my eyebrows
      • No eyeshadow or blush
      • a bit of eyeliner (NOT A LOT) helps the eyes stand out
      • Nude lip! Use a bit of concealer if you want!
    • Eyelash glue is great for not only keeping eyelashes on, but putting any other objects (such as rhinestones) on your skin!
    • Coconut oil or egg yolk work as moisturizer
    • Use brown sugar + olive oil to exfoliate/ moisturize
    • Make a face mask out of egg whites
    • To get rid of stretch-marks / scars: put bio oil over the marks after showering

Alright, there you go, the first set of con notes! Hope this was helpful for any of y'all that cosplay!

~Shaak

Friday, April 11, 2014

Azula and Aang Cosplay Pt. 4 COMPLETE!!

Ok, so last part: the dress and Aang.

I stayed up until 10 the night before the convention modifying the dress, which I cut to look like this:


and added trim with fabric similar to this.

And that's it, really. On the day of the con I did smokey eyeshadow with red in the crease, and did general cosplay makeup... yep. I did most of it in the car lol.

For Aang we got a yard and a half of orange fabric, a yard of yellow fabric, and some red woven material. We basically safety pinned it like a toga. He wore brown pants, black tennis shoes, and a wig cap that I painted the arrow over.

So, yep, that's it! I'll have a post about the convention (and pics) up soon!

Oh! And I found this on tumblr... if you scroll down, the second picture is of my brother and I! http://humanitys-cutest-soldier.tumblr.com/post/81948871086/kraken-con-spring-2014-was-an-absolute-blast

~Shaak Ti

Saturday, April 5, 2014

Azula (and Aang) Cosplay Pt. 3- Armor

Armor armor armor armor

Gahhhhh this was so stressful and fun and amazing!

I really learned a lot through this part of the process. I hadn't worked much with vinyl before, and never on this large a scale. Oh well, here's some pictures of the progress...

What I used:

  • Exacto Knife
  • 1 yd. black vinyl
  • 1/3 yd. red vinyl
  • 1/3 yd. cream vinyl
  • 1 yd. red rope
  • 1 yd. black rope
  • 1 yd. cream rope
  • Leather hole puncher
  • plastic board
  • art board
  • patterns from drafting paper
  • comic book (straight edge)


Belt Buckle- the Fire Nation Phoenix 

Ready to begin on the details!
Crown

Shoulder Pad
Shoulder Pad Detail
Other Shoulder Pad thing
Glove ties
Gloves

Oh, doesn't my room look lovely ;p
And finally, the wig (took me an hour and a half to style... oh, well, it's done now, yay!)


Well, the convention's tomorrow! I'm so excited! Tonight I'll be doing the final run-through with the costume, to make sure it all works, and I'll have some better pictures of it when I'm back. Haha I'll have lots of pictures and notes and all sorts of stuff when I come back! I'm SO  EXCITED I JUST :LSDKJFLSDKFJSDL:FKJ

*cough* yep


Wednesday, March 26, 2014

Azula (and Aang) Cosplay Pt. 2- Drafting Armor Patterns

Alright, part 2! Yay! On Wednesday Dad brought me home some old blueprints (he's in construction) so that I could start drafting my costume,

Ok, first I want to say that for lunch on Thursday i had only round foods, and I'm super proud of myself. Yep. ok, moving on...

So, I spent the past few days making the patterns for the armor. I feel very lucky that I got most of the measurements right on the first try!

My materials- I also ended up using an Exacto Knife to cut the pattern, instead of scissors.

Here's the pattern I found online. Most of my measurements were pretty similar.


I didn't like how it turned out at first, so I trimmed it up...

Next I made the collar

Pedicure break! I've been doing the same color since CVI...
Back/Front pannels

The whole thing!

Close up of the belt buckle- the fire nation phoenix!
I used a cup to outline it and cut it.

So, yeah! The costume's coming along great, and I have the measurements for Aang.


Friday, March 14, 2014

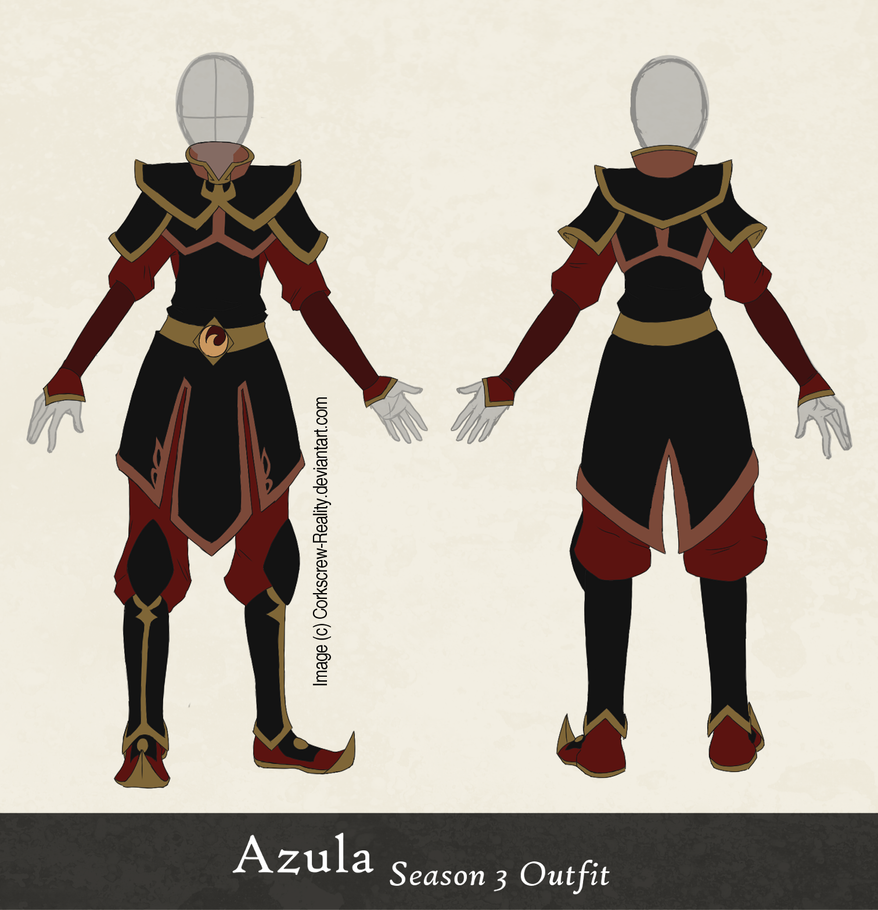
Azula and Aang Cosplays Pt. 1

Alright, here we go on my next big cosplay endeavor! I'm planning on going to Kraken Con on April 6, so I don't have a lot of time to pull this together. Fortunately, I have a two week break, so I should be able to get it done.

I also have to convince my brother to be Aang.

AZULA

Costume plans/notes


Materials (already have):

  • Amour
    • One yard of vinyl 
    • Iron on interfacing
    • yellow and orange ribbon or some similar lining
    • velcro/clips (I haven't totally figured out how I'm going to keep it all on)
  • Mom got me this lovely wig in black for Christmas. It's perfect!
  • Black boots (supposedly... I have yet to ask Mom if I can use hers :p)
  • Jumper Skirt
    • Fabric choice 1,  choice 2 (idk which one I like better... what do y'all think?)
    • Plastic boning
    • iron-on interfacing
    • yellow ribbon 
  • Red shirt/pants (LIGHT FABRIC)
    • I'm planning on just buying and modifying this, since I don't have time to make it all by scratch
  • Gloves
    • I honestly have no idea what to do here. Funny, I hate having to deal with gloves in cosplay, but all of my major projects have gloves :p
  • Belt
    • I'll either make it out of leather or up-cycle an old belt.
  • Props
    • I'm thinking about making some sort of flame prop... maybe like this
My uncle is going to help with all of the leather work, and I'll keep y'all updated on that. As with any cosplayer, I want to add my own creative spin on the costume. I feel like, if ATLA were real, the fabrics of the Fire Nation royals would be very ornate- that's why I really want to use Jacquard fabric. I've also been inspired by this cosplay to maybe add some design to the armor:


AANG
Ok, in all honesty, I haven't even asked my brother about this. But he loves ATLA, so he may agree to do it. I honestly think his season 3 outfit would be easiest (and I also really want to paint the scar on his back)
Obviously he would need a bald cap, and the pants would just be grey/black sweats. The top would be more difficult, because it would need to be held in place... I want to go with a simple fabric, sticking with Airbender tradition. I have no clue what we're going to do about the boots.

So, yeah, tell me what you think, and any suggestions would be much appreciated! And feel free to ask any questions!

(and i have no idea why the link colors are so inconsistent...)